This is a sponsored conversation written by me on behalf of Cricut. The opinions and text are all mine.
I have been choosing a word and theme for my year for at least the past few years and I love how this helps me stay focused during the year. Last year I wanted to come up with a creative way to display my word all year so that I am reminded everyday of what type of year I want to have. You can see how I creatively displayed my 2018 word by clicking here: Word of the Year Pillow with Cricut.
This year I have the same goal of displaying my word all year and I wanted to do it in a more creative way and share it with you. If you love Cricut, getting creative and setting your focus for the year, you are going to love this tutorial!
What you will need:
- Cricut Machine (Cricut Explore Air 2)
- Cricut Patterned Iron-On
- Cricut Glitter Iron-On
- Cricut Faux Leather
- Cricut EasyPress 2
- Cricut Design Space
- Cricut Iron-on Protective Sheet
- 12″ x 12″ Shadow Box (JoAnn)
If we happen to have the same word of the year and you like my design, you can access it here in Cricut Design Space. This design is all ready for you to cut using your Cricut.
Step 1: Choose your Iron-on Materials. For this project I am using two different types of Cricut Iron-On – Patterned and Glitter. Once you have your materials ready, click “Make It” in Cricut Design Space.

Step 2: Cut your Iron-on. Pattern side down for patterned iron-on and shiny side down for glitter iron-on. Use a light grip mat for the patterned iron-on and the standard grip mat for the glitter iron-on and be sure to click the mirror setting. Follow the cutting prompts on the screen and then weed your material. You can use the Cricut BrightPad to assist in seeing where to weed your images.

Step 3: Prepare to layer. Glitter iron-on should be used as the top layer. So for this project you will place the pattern iron-on first. I am using the EasyPress 2 as my heat transfer method. To view the settings you should use for a project, Cricut has an interactive guide that allows you to input your iron-on material and base material.


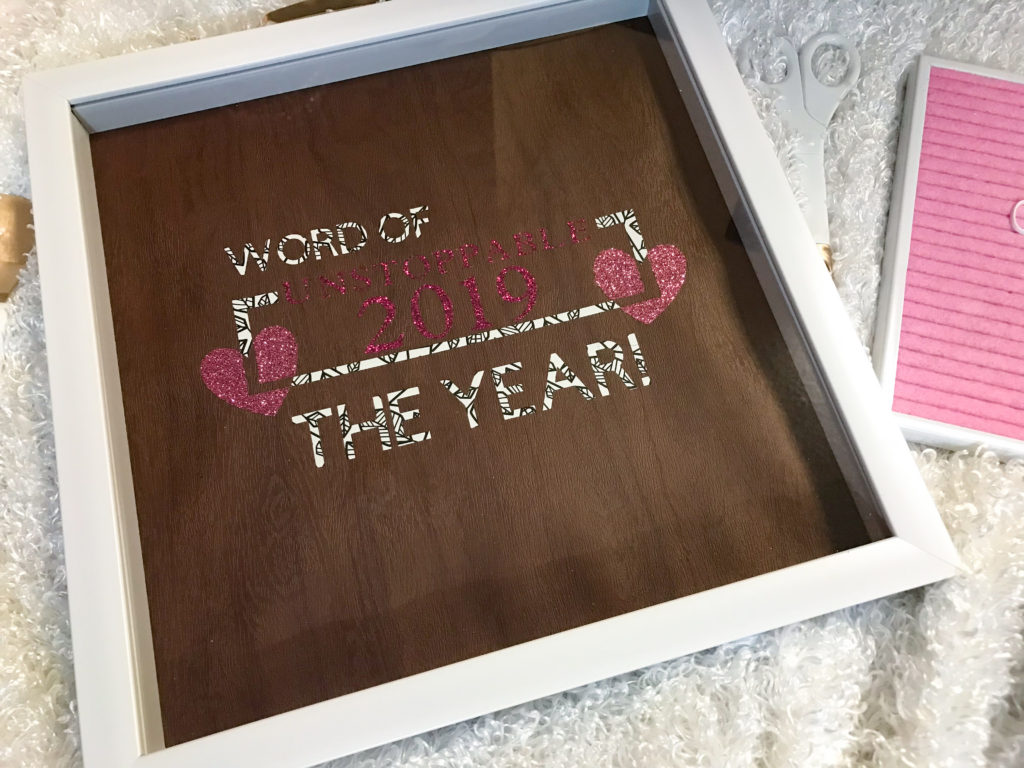
Step 3b: Layer One. I am using a 12 x12 woodgrain style of faux leather by Cricut. Place the word of the year text and bar first (centered) on the faux leather. Follow the settings above for the patterned iron-on. Patterned iron-on is cold peel. So once you are done using the EasyPress 2 for this step wait a minute or so for the material to cool and then you can peel it off. *Note: Glitter Iron-on can be peeled off warm.


Step 3c: Glitter Iron-on layering. Repeat the heat transfer process using your EasyPress 2 with the correct settings for the glitter iron-on. There are two pink glitter colors used in this project – one for the words “UNSTOPPABLE” and “2019” and one for the hearts. You will need to place the words first and then the hearts. Glitter iron-on is warm peel so you can peel off the transfer paper right away.

Step 4: Place your faux leather woodgrain word of the year image into your shadow box. Then proudly display this word in a conspicuous place all year!